

Peppermint candies are so festive and classic, no matter what time of the year it is, the sight and smell of peppermints always reminds me of the holidays. Peppermint Candy Ornaments are thrifty and quick to make, they’re a handmade project that is perfect for this time of the year, when we’re all running a little lower on money and time! You could make a dozen of these edible ornaments at just a dollar per bag of peppermints!
These melted candies aren’t just for the tree either! Use this method to create cute little edible toppers for cupcakes or brownies (what is more festive than the flavors of chocolate with peppermint?!).
I first melted peppermints in cookie cutters after seeing the idea in an American Girl magazine, back in the 90’s (I’m pretty sure that a project centered around scalding hot, melted sugar would not make it into a children’s magazine these days). As easy as this project is, I had a difficult time finding anything similar to this online, so I decided to share it.
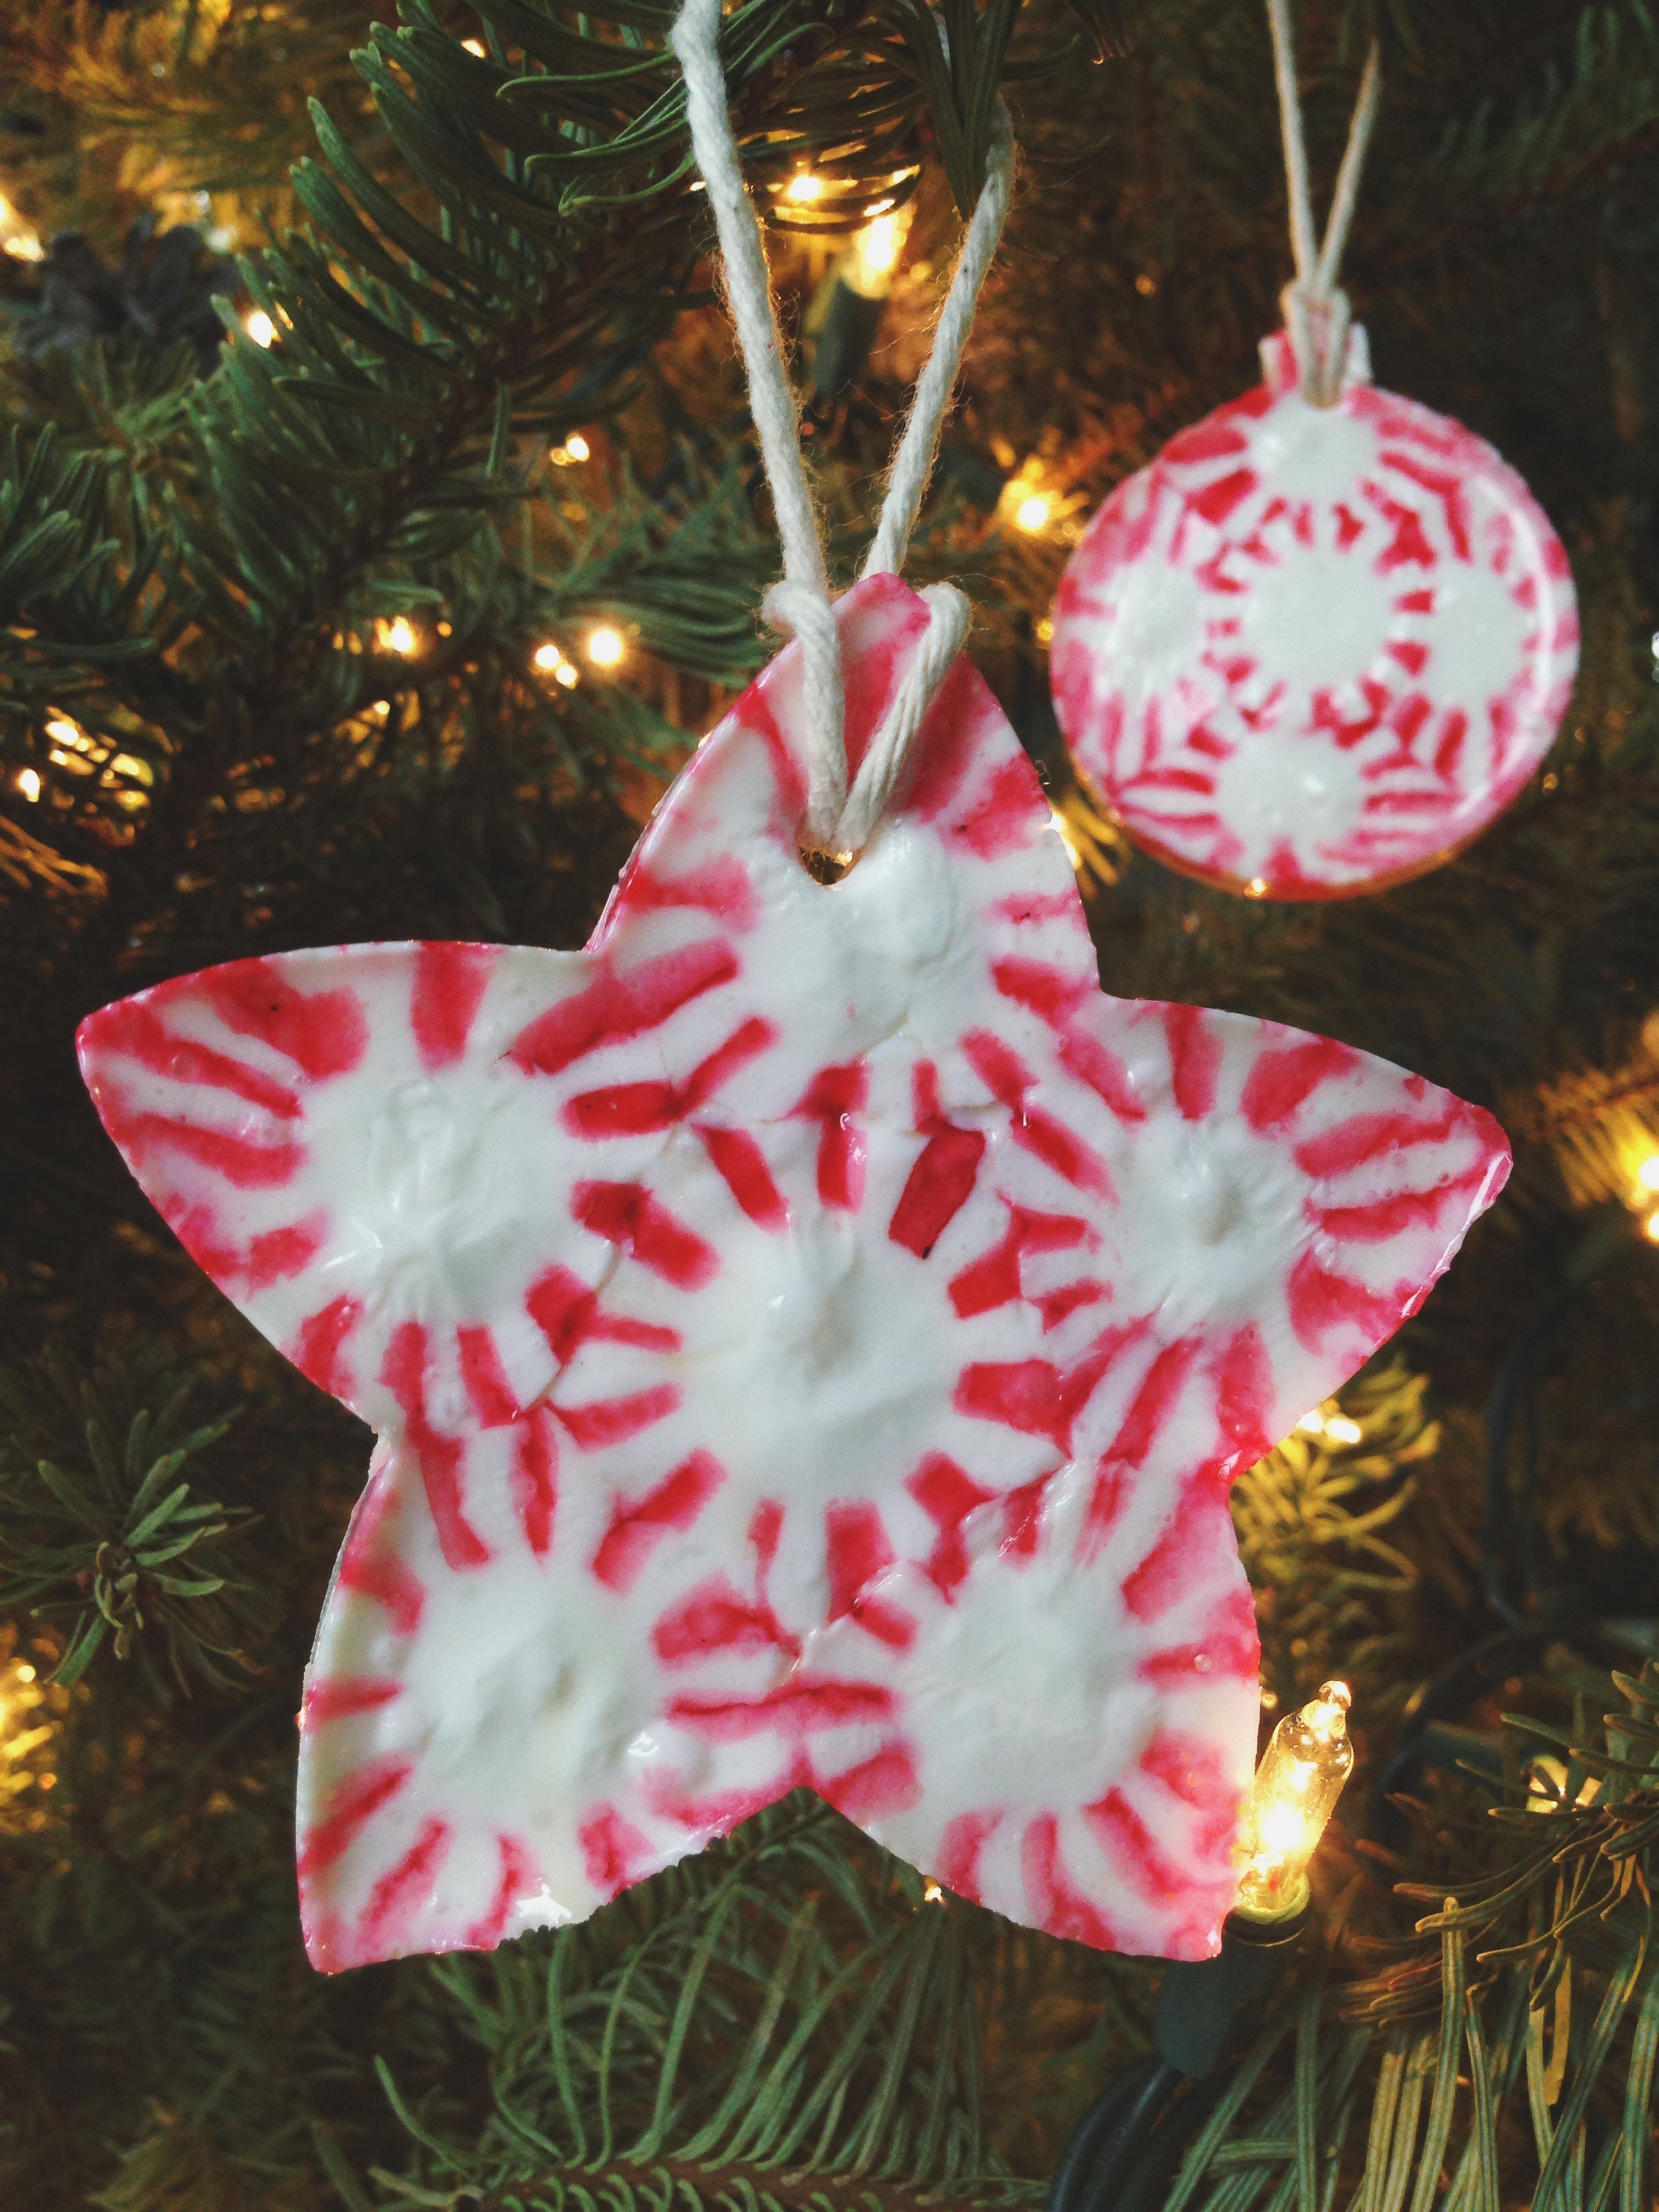
Include your kids in creating this fun craft project, spend an afternoon making homemade ornaments for decorating your Christmas tree this year!

Metal cookie cutters are a must! I love using this: Vintage Christmas Ornament Set and this: Snowflake Set!
Peppermint Candy Ornaments
- peppermint candies
- metal cookie cutters
- non-stick cooking spray
- parchment paper
- toothpick or skewer
- twine or ribbon
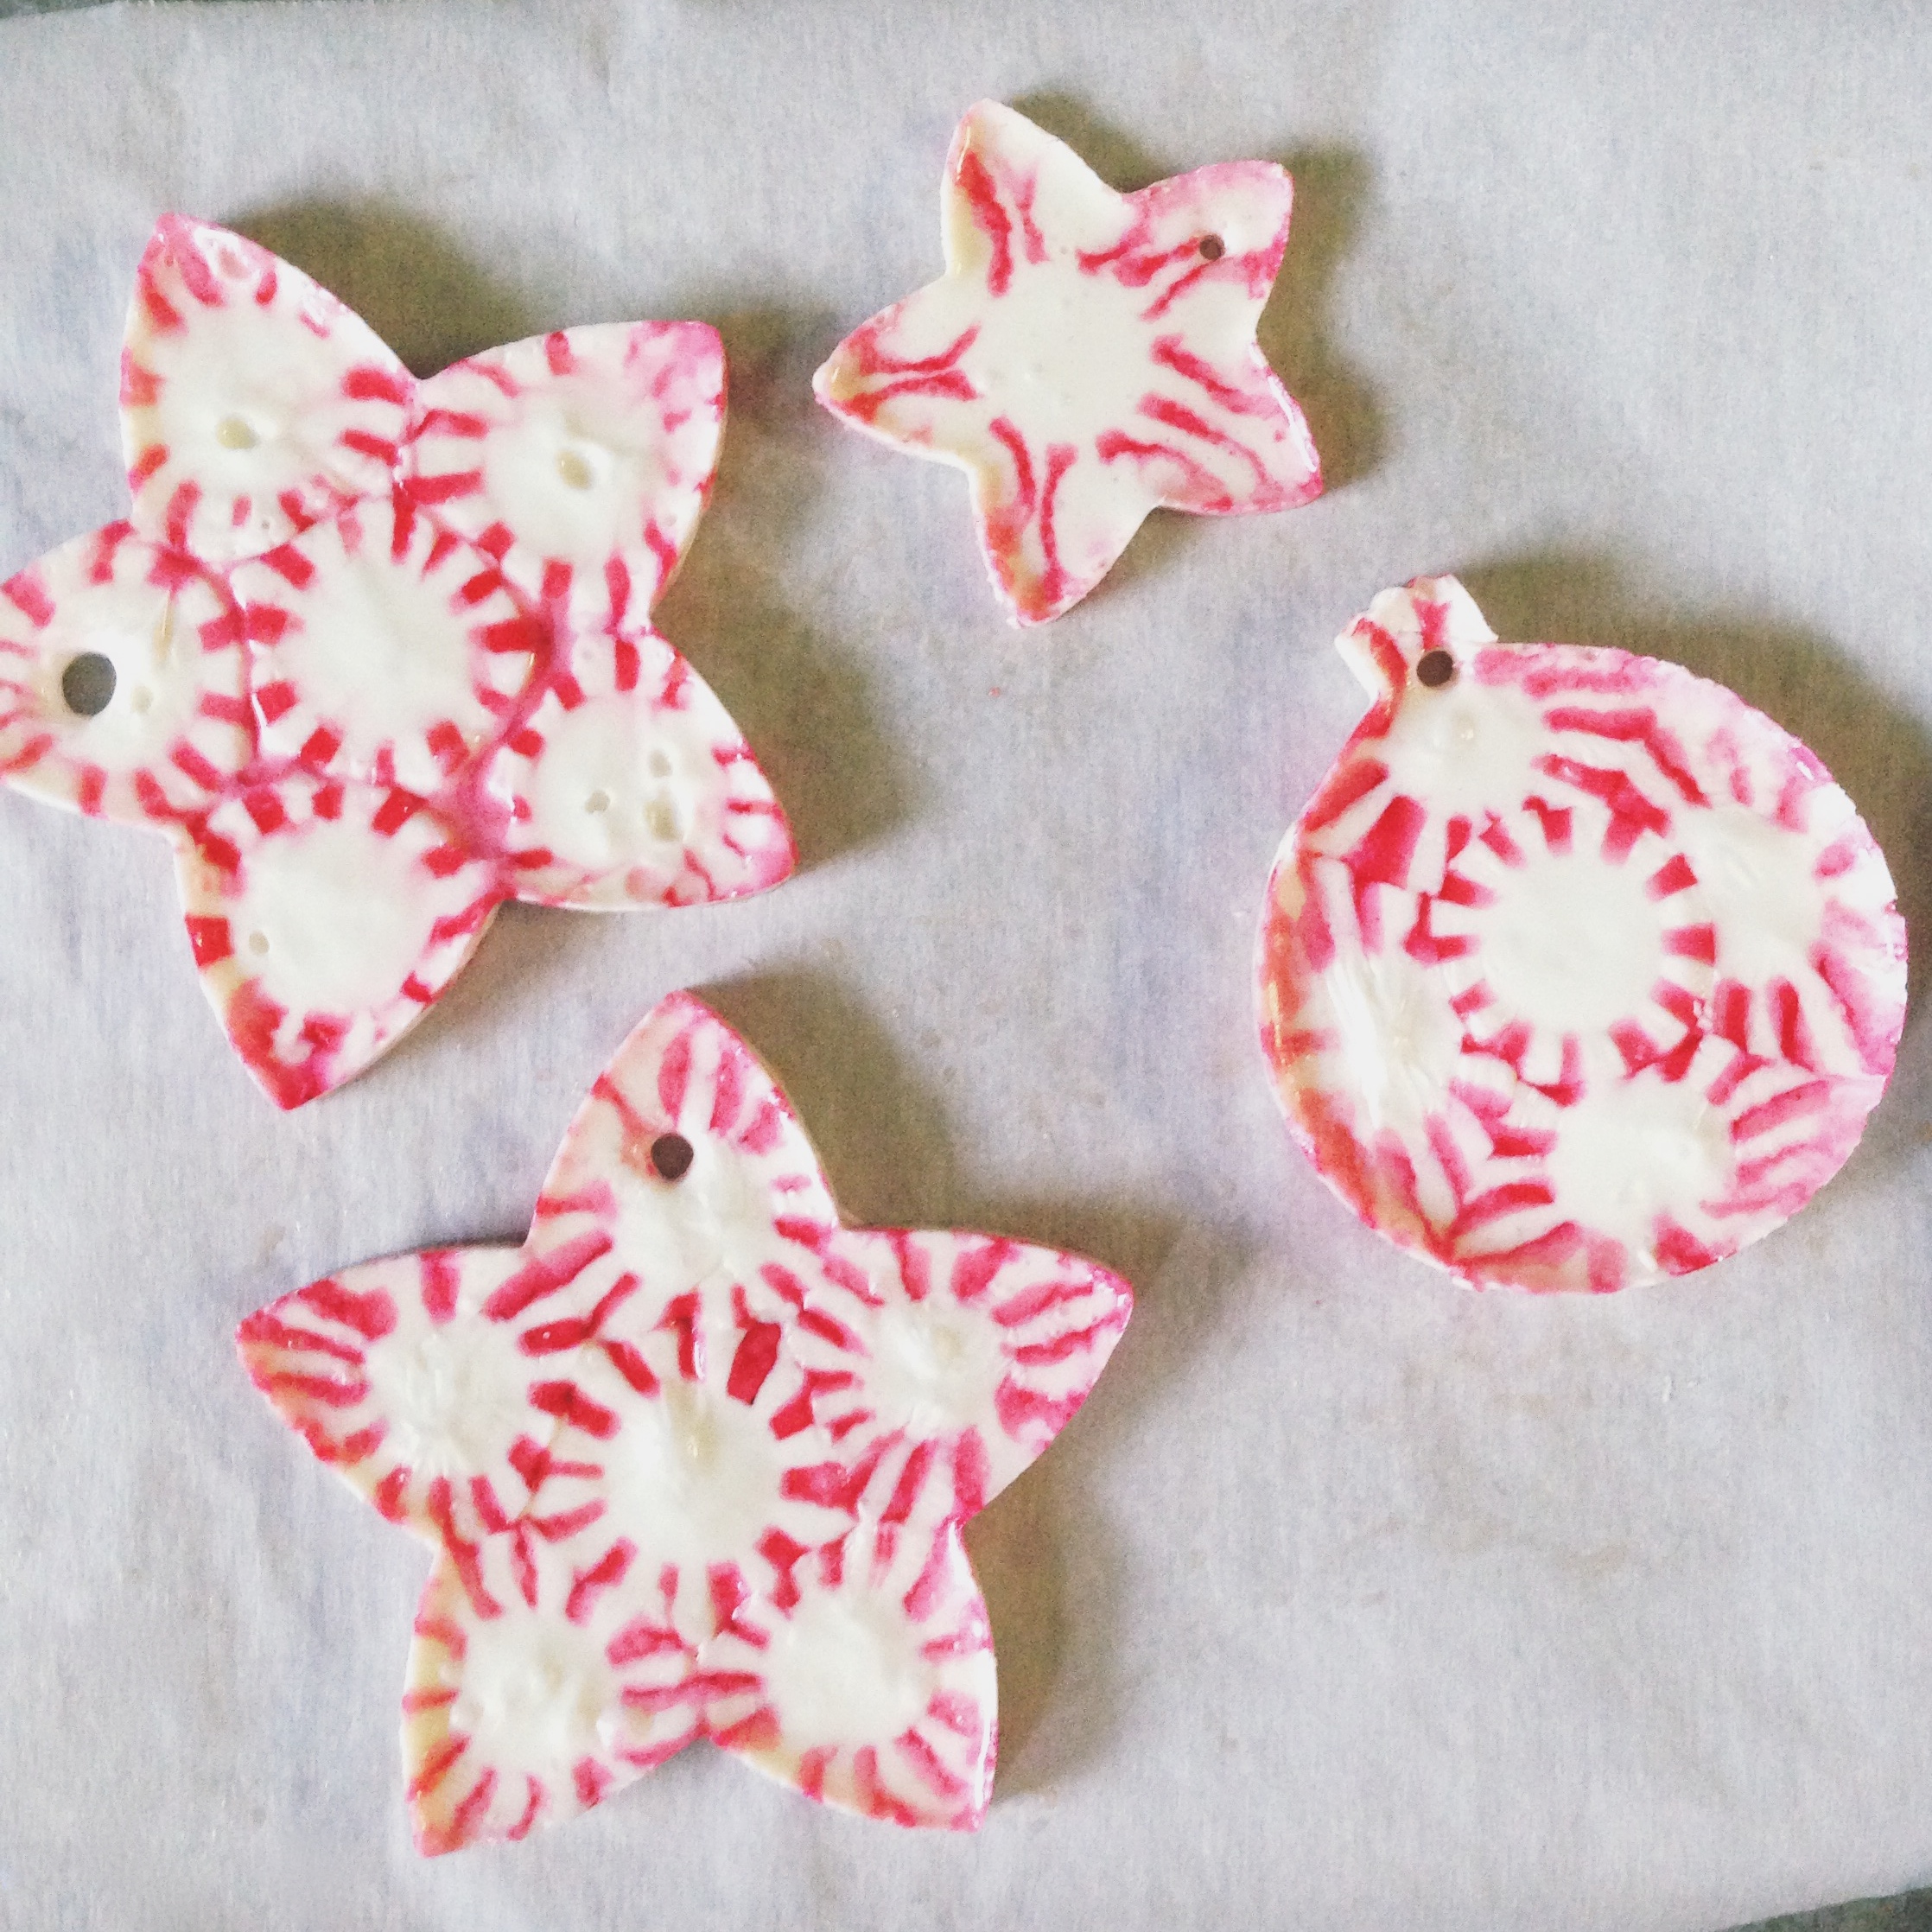
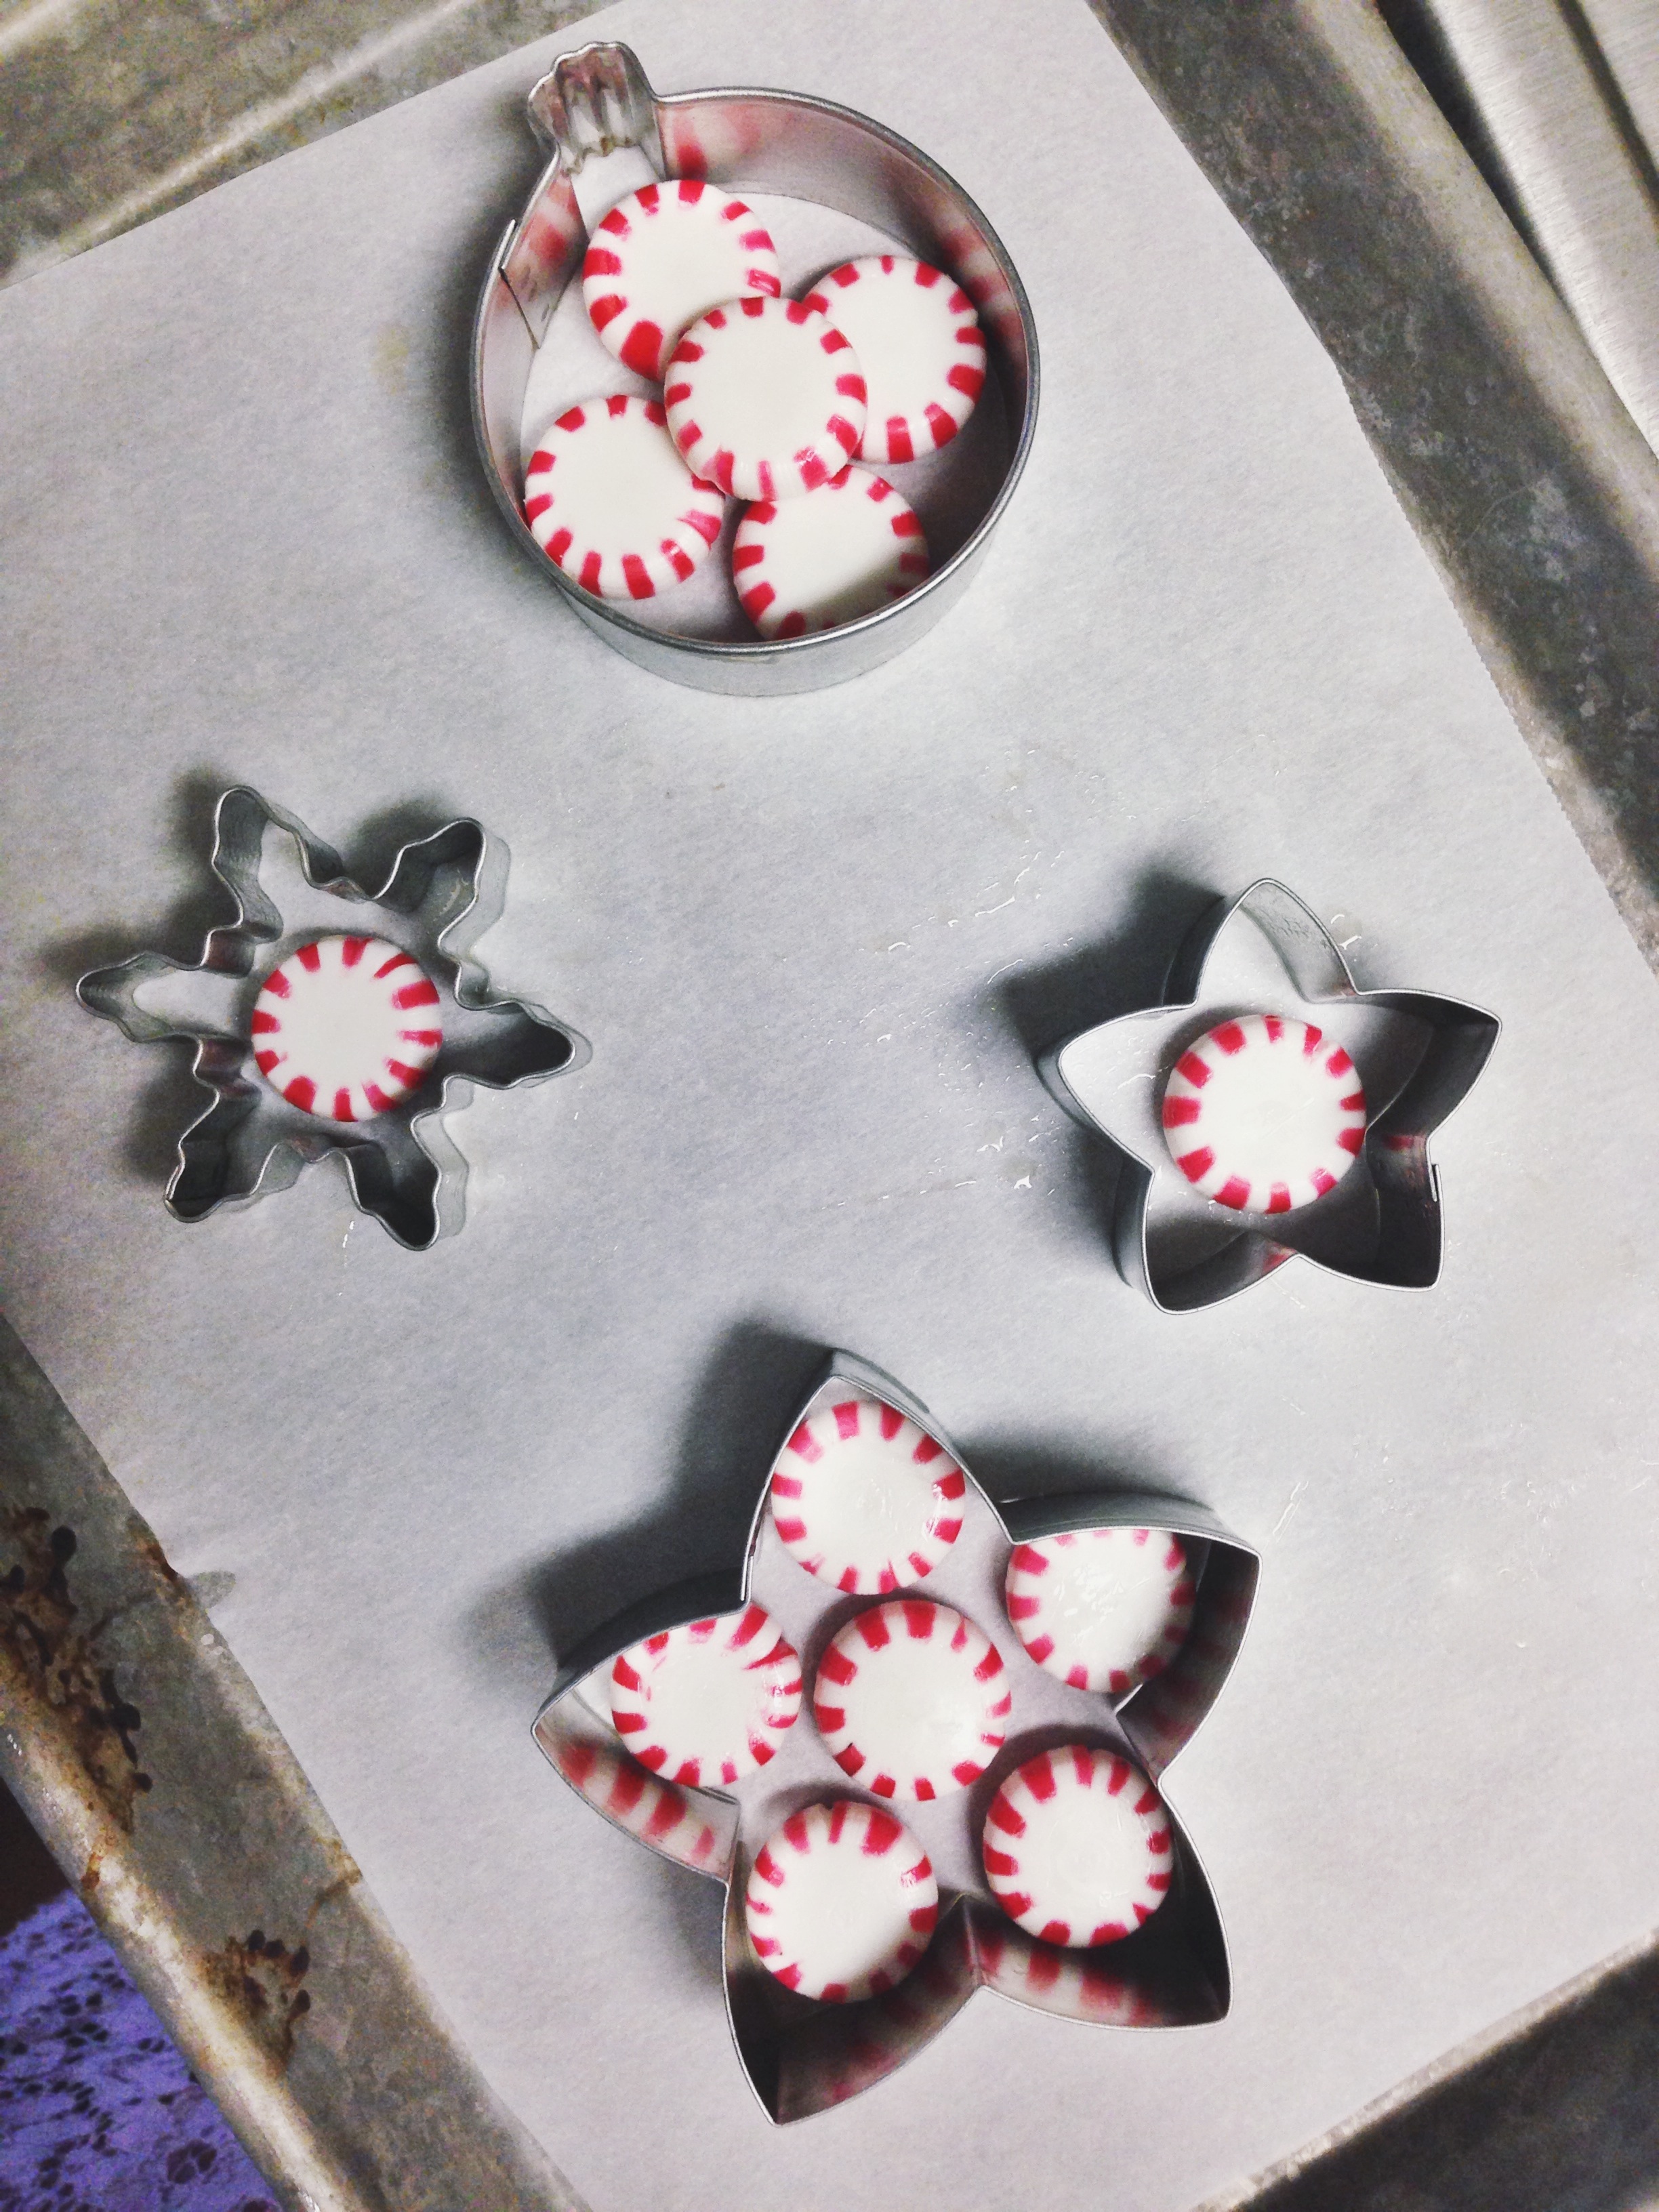
Preheat oven to 350F. Line a baking sheet with parchment paper. Spray the inside of each cookie cutter with cooking spray. Lay cookie cutters on baking sheet and fill with a layer of peppermints.
Bake for 3-9 minutes. Keep an eye on candy as it melts, remove from oven when candies have melted together.

Lightly coat a toothpick with cooking spray and use it to make a hole in each group of candies. Let candy sit inside cookie cutter until it re-hardens. Once hard, carefully stretch out the cookie cutter, pulling it away from the candy, to pop out your ornament.
Wrap these peppermint treats individually in plastic wrap, if you’d like.
• Many of you have contacted me about a sealer that would be suitable for this project. Unfortunately I do not know of any available sealants that would work with these ornaments (the moister of sealers causes the candies to melt). Similar to a gingerbread house, these ornaments may not last for more than a season but it’s a fun (and inexpensive) project to create every Christmas season!
• These ornaments are really so easy, but it may be helpful to make a trial run: Place one peppermint-filled cookie cutter into the oven to get an idea of how fast the candy will melt and how quickly it will cool and re-harden after you remove it from the oven.
• Try turning down the temperature of your oven, so that candies will melt more slowly, if your candies are melting unevenly or at different rates.
• Squeeze as many peppermints, side-by-side, into your cookie cutter as possible. If peppermints melt into too thin of a layer, try layering peppermints in the cookie cutter to make a thicker, more sturdy, ornament.
• Large, simply shaped, cookie cutters work best for this project. The more intricate the cutter, the more likely ornaments will break when removed from their cookie cutter mold.
• Don’t forget to be careful around the hot metal and melted candy! This is a fun craft to make with children, just be sure to provide plenty of supervision.
• Try not to handle the ornaments too much because they can get sticky, but they should be fine after they’re hanging on the tree.
Here’s to a happy handmade Christmas!


What a creative idea! Love this!
Thank you so much!
I did this in a pie pan and made little candy trays that I filled with assorted homemade goodies. I wrapped them in cellophane added a bow and gifted them to neighbors and coworkers. They were a HIT!
Missy, I like that idea for a gift for teachers or neighbors. How long did it take to melt into the pie pan? What did you coat it with when done so it didn’t get sticky, don’t think you’d want it on a table that way.
I’m not Missy, but I have done this. 350* for 8 minutes. To make a tray, you can add peppermint sticks to the edges for handles. I didn’t coat them with anything because the “tray” or “dish” is also meant to be eaten ;-) The dish is meant to be put on a serving dish after it’s unwrapped from the cellophane. I usually put homemade marshmallows or truffles on mine, but you could do something different.
Just as soon as two of my younger great-grandsons come to visit again, we will make these. We made the borax ornaments for Christmas 2014 the day after Christmas 2013. They were so thrilled to make them, and it was such a sweet experience to put into our memory banks. Thank you for sharing!
Jeneanne, that sounds like so much fun! I hope you enjoy this recipe as well. Thank you for taking the time to leave me a comment!
have you tried doing this with other candies, like werthers. mmmmm!
I’d think that any hard candy would probably work, it’s worth a try!
Could you wrap them up in cellophane and give as treats?
Yes, I’ve tried that, it’s a great idea!
These work beautiful with the clear hard candies as well. They’ll look like stained glass!
Love that idea!
I think the idea of the clear colored candies would be awesome! I think I might shatter a few to make the colored areas smaller…lol
I want to eat them all they look delicious :)
These are so amazing! What a fun, creative idea. I can’t wait for Christmas time to try this!
Janie
ohsweetjane.com
This is such a cute idea. My family always hung candy canes on the Christmas tree. I always loved eating them, but I didn’t love the way they looked on the tree. Now the candy on the tree can look and taste great! Thanks!
They are fun to make, and great as a possible treat! Just be careful if you’re planning on storing them for future use- they will melt if not air-conditioned over the summer.
Great advice, Erin! I’d also be worried about critters finding them, if they’re stored in an attic or garage! They’re fun and inexpensive to make new every year!
Jolly Ranchers going to decorate my wreath on the door with just a few white lights a
These would be a cute gift for horse owners, too! Horses love peppermints!
What a fun fact, thanks for sharing!
Tried this many years ago using small tart pans and Brachs cut rock candy. Very cute but could never get a clear sealer to stick to them.
What a clever idea! Can’t wait to do for Christmas!!
But of course I must try this. Clever!
Can’t wait to try this with my grandkids!! Cheap,easy, and beautiful !!!
Love this! Thank you for sharing; can’t wait to it :) Wonder if I could store them, carefully packaged, in the freezer? That would keep critters away from them… Love the concept, and they seem so inexpensive, but beautiful!
What kind of sealer did you use?
I actually didn’t use a sealer on mine, they’re so inexpensive that I just make new ones each year, but I was thinking something like this might work well: http://www.amazon.com/Aleenes-Spray-Acrylic-Sealer-Finish/dp/B003W0A19U
Hey! I love this idea and am trying to use them as a festival of trees decoration! I have tried to make them 3 different times but thwy always shatter when i try to take them out… I let them harden and pushed gently but they still break. Any suggestions?
Hi Claire! Did you lightly coat the cookie cutters with cooking spray? Also, I did find that it was quite difficult to remove the candy from small and more intricate cookie cutters. Another idea, try stacking the peppermints so that they melt to form a thicker layer… if the candy melts and spreads too thin I found them to be more prone to shattering.
Reblogged this on In Love With The Lord Poetry and Prose.
Too cute. Love this idea! Thanks for sharing.
Hi Shae, we loved your peppermint candy Christmas Tree ornamanets and would like to include them in our craft section in our 13 December issue of The Salvation Army’s national magazine Warcry. Would that be OK? Look forward to hearing from you, June.
Hi June, I just sent you an email! Please let me know if you have any other questions.
Love this idea! definitely going to try it!
These are great. My only question is how to prevent ants?
Out of all of the creepy bugs in Texas, surprisingly ants aren’t much of a problem – so I haven’t tried this – but I’d suggest using a sealer like this one to deter sugar-loving ants: http://www.amazon.com/Aleenes-Spray-Acrylic-Sealer-Finish/dp/B003W0A19U
What kind of sealer would you use?
I wonder if they could be stored in the freezer for use year after year?? Hmmm!
Can’t wait to try!
I actually didn’t use a sealer on mine, they’re so inexpensive that I just make new ones each year, but I was thinking something like this might work well: http://www.amazon.com/Aleenes-Spray-Acrylic-Sealer-Finish/dp/B003W0A19U
These are great, thanks so much for the fun idea.
I tried making 2 batches of 5, but they just come out way to brittle to give out as gifts. Only 1 survived. :(
Oh, I’m sorry to hear that! If you wanted to give it another go, maybe try layering the candies to make a thicker and more sturdy ornament?
I can’t wait to go through my cookie cutters. Love this Idea. Thank you
love making crafts and this sounds good
i have done this before but i made a tray for cookies instead just melted a bunch of them on a tray so cute
Out here in Los Angeles where ants are always a problem, I’d be worried about them finding these since ants can find a microscopic grain or sugar within 100 miles. haha. I was thinking they’d look great hanging from an outdoor pine tree we have.
I love the idea of using these as an outdoor tree decoration!
Love it! So creative.
On my tree
Wonder if you could spray the inside of the cookie cutters with cooking spray, so you don’t have to ruin the cookie cutters when you take the ornaments out!?
Hey Kimberly! Yes, I suggest doing that in the directions, it has always worked well for me. :)
cant wait to try these and use as a happy for table at Thanksgiving. Do you think butterscotch would work ?
I love that idea, Lisa! It’s worth a try!
love them, just had 3 break out of 21! do you have any ideas to piece the broken ones back together? <3
Joyce – why not put the back in the cookie cutter and re-melt it? You can add additional candies if needed to make it more sturdy. Worth trying anyway.
Peppermint ornaments
I was thinking it might prevent breakage if you removed them from the molds while they were still slightly soft but no longer liquid. They wouldn’t break then and you could put them in the fridge to harden faster and prevent them from spreading out and losing their shape.
Wow what a great idea! Who would have thought that peppermint candy could make such cute ornaments!