


I’m pretty excited about sharing this DIY project! We’re really into creating items out of concrete right now (you can find our Industrial Concrete Ball DIY here). Industrial home decor is so popular right now, we’ve seen concrete pieces that we love at places like West Elm and Restoration Hardware.
This DIY is such an inexpensive way to bring those pieces into your home. We had to eat quite a few pringles for this project (no complaining here), I’m quite happy that our project is finally complete. These concrete candle holders are great for decorating your home or outdoor space!
Concrete Candle Holders
Needed:
- concrete mix
- pringles cans
- votive candle (or similar circular object that is slightly larger than a tealight)
- plastic wrap
- large disposable container
- mixing tool
- something to funnel the concrete into your mold
- tealights
Rinse out your pringles cans. You can make these tealight holders as tall or short as you’d like… to make them easier to fill, cut down pringles cans that you plan on using to make short tealight holders.
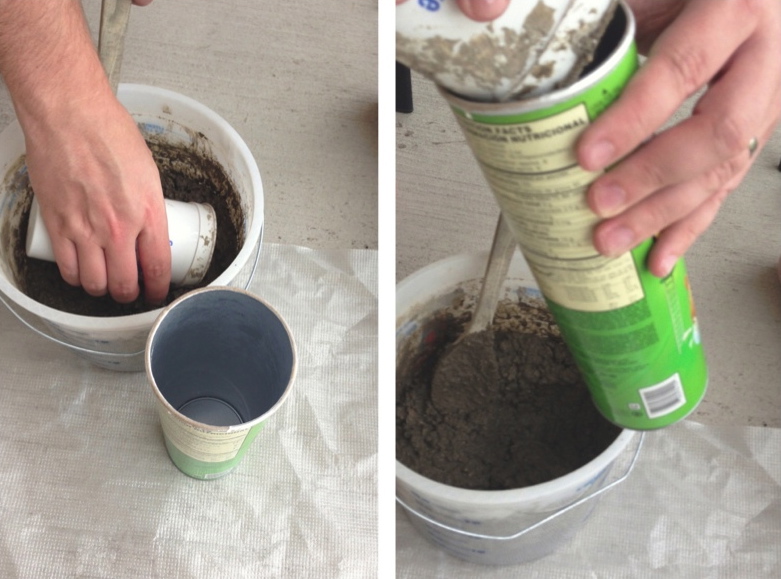
In a disposable container, mix up concrete according to directions on package. Funnel concrete into the pringles cans.

Tap the bottom of cans to help the concrete settle. Wrap a votive candle in plastic wrap, center it in the pringles can, and press into the concrete (you wouldn’t have to use the plastic wrap if you’re going for a less rustic look). Let dry for several hours, then remove just the votive candle.

Let the concrete dry overnight in the pringles cans. Then tear the cardboard can away from your concrete candle holders. Use water to rinse off any concrete dust.

I think we’re going to keep these in our living room, though they would also be a perfect centerpiece for our outdoor table. We may need to make a second set!

I love these! I’ve always wanted to do some projects with concrete, but am scared of the mess?
There’s a little bit of flying dust when the dry concrete mix is first poured, but the rest of the mess is easy to contain (we usually put down some plastic or cardboard). Little bits of dried concrete are easily swept away, we even re-use our container for mixing concrete, just pop the concrete out of the container after it dries.
You’ve convinced me! I’ll try it. :)
They look lovely, I wish I was good with my hands too…thanks for liking my post. Have a wonderful week!
Thank you! It really is easy, you should give it a try!
What a lovely idea! So simple and cheap yet so stunning. Thanks for that :)
Thank you!
This is really cool!
Good afternoon, what type of mix did you use? I’ve tried a similar project but the large stones in the mix push out the side or the bottom of the “pillar” how did you get yours so smooth?
Dan, we actually used the most inexpensive mix we could find: Quikrete Conrete Mix http://quikrete.com/ProductLines/ConcreteMix.asp. We watered down the mix enough so that the cement settled around the stones, though some of the rocks were visible around the top of the pillars. We also tapped the containers against the ground to help the concrete settle evenly. I hope this helps!